Friday, October 31, 2008

Fruit Bats


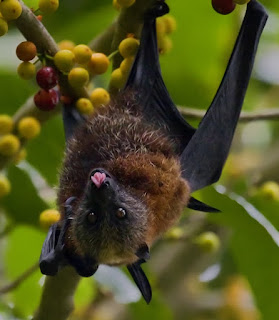
One of the things I love about American Samoa is the abundance of Fruit Bats here. Every evening you can see them flying around. Some of them are huge. But, they can also be seen in the daytime, which makes it a great time to try and find one hanging around to photography. I found this tree with Fruit on it with a bunch of bats lounging away. Unfortunately at the time I did not have a long enough lens with me. The next afternoon I took my 100-400 lens and hoped the bats would still be around. As luck would have it, it was rainy, but I decided to make the 40-minute drive anyway. When I got there, there were a few bats hanging around. I sat in my car and waited for the rain to stop, which it did for about 5-minutes. I quickly jumped out of my car and my lens kept fogging up (got to love the humidity here). Now wiping my lens with a lens cloth in this humidity is a nightmare. I found that a lens pen works. These things work great and have a brush on one end, and this type of eraser head on the other (do a google search or check out http://www.bhphoto.com/ where I order all my stuff from). It is the only thing that really helps me clean my lens and remove fog on the lens. Now, as a side note, I found that it helps to put your camera in a large ziplock bag with desiccant silica. This helps when you take your camera from a cool place (like my air condition house) to a warm place. I use the ones from Pelican. You just stick the thing in the oven when it needs it and it can be used again. They are great. Of course, you have to remember to use them (which I had forgotten in my rush). In the end, got a couple of photos before it started raining too hard. But I like this photo with it's tongue sticking out.

Thursday, October 30, 2008

A Different Perspective


I'm always goofing around looking to try things to put a unique perspective on my photos. One of the neat attachments I have for my camera is a bogen Magic Arm with a bogen super clamp (you can google to see photos of this). It allows you to attach your camera to things like bikes or even broom in this case. I attached the camera to the broom using a wide angle lens and set the focus manually. Then using the timer on the camera and a slow shutter speed, I did some sweeps of the broom until I got something I liked. In this case I used 1/8 second. This photo (with the exception of normal adjustments in photoshop) was done in camera. The blur was created by using a slow shutter speed and the broom is kept in focus as the camera was attached to the handle of the broom. Ended up liking this photo in black and white the best. So if you have some money to spare, this attachment is neat and allows you to do some creative things.

Wednesday, October 29, 2008

Church


American Samoa must have more churches on a per capital basis than anywhere else. Everywhere you look, there is a church. While driving home after a rather uneventful day looking for photographs, we decided to stop at a little store to get some food. I looked up and found this beautiful cloud formation. Knowing I had to photograph it, I knew there was a church a couple of hundred yards down the road. I got in my car and drove to the church, which luckily had no cars parked in front. Knowing that the dynamic range (the difference between the brights/darks) would be too much, I set my camera on a tripod and shot a series of photos at different exposures. Back at the house I combined all the exposures into a HDR (High Dynamic Range) photo, using Photomatix (a program you can buy to help with HDR photos). I liked the way this photo came out. The moral of the story is you never know when a photo opportunity will present itself so be on the lookout.

Tuesday, October 28, 2008

Close/Closer/Closeup

It is amazing at how much more details you see when you eliminate the unnecessary. Take the first photo. Wonderful Tattoo. But it wasn't until I zoomed in (last photo) that I could see the intricate details of the tattoo. One of the first things I learned as I went through various websites as a new photographer was simplify and eliminate distractions. This draws people to what is important in your images. There are a number of ways to accomplish that. But first, determine what you are trying to accomplish with your photo then eliminate distractions. For outdoor photos, I love to use a long lens to achieve a shallow depth of field and a close crop. Not everyone likes that but since this is what I enjoy, I photograph that way. So enjoy some more photos from the festival.


Tisa's Tattoo Festival (Continued)


As promised, here are some of the photos from Tisa's Tattoo Festival on Day 2. The art work was incredible. Remember to click on the photo to see the larger size. I will post some more tommorrow so check back.


Monday, October 27, 2008

Tisa's Tattoo Festival


Tisa's barefoot Bar is one of the best spots in American Samoa to relax and have a cold beer. They hosted the Annual Tattoo Festival and it was great. Although I missed the first day (see prior post) and was really disappointed, I was happy to attend the second day. Great People, cold beer and yes Tattoo's were about. Now This is more than just a Tattoo event. It is a celebration of traditional Samoan Tattooing. This traditional art form is being revived, in part due to the efforts of Tisa and her Husband. They are true Pioneer's in the preservation of the Samoan Cultural in American Samoa. So, although I have some wonderful photos I hope to post over the next week or so, I wanted to start off with a photo of Tisa from the Tattoo Festival. But, after a full day of enjoying the cold Vailima Beer (watch the big bottles folks, they sneak up on you) I am ready to sleep. GOOD NIGHT.

Sunday, October 26, 2008

Important things


After missing the Tattoo festival in American Samoa last year, I was looking forward to spending a day photographing this event. But as luck would have it, the kids announced that their annual Halloween Party would be on the same day. Although I love photography and was looking forward to this event, my kids will always come first. Luckily, it looked like the event would start at 10:00AM and the party for the kids wasn't until later in the afternoon. Arriving at 10:00 it was soon apparent it was not going to start on time. So I blazed down to a sewing shop to pick up one of my kids costumes and then went back at 12:40PM. Still not really starting. It ended up with the show starting at about 2:00PM, which meant I would only have 1-hour before I had to leave. Ended up with a couple of photos before I had to pack up. But you know what, the kids had a great time at the Halloween Party and the smiles on their faces are just too important. Tomorrow the tattoo festival continues so maybe I will have better luck then.
The photo above was taken on Friday. Right after work I went home, grabbed the kids (they had a day off) and headed towards the beach Arrived in time for a nice Sunset and I really like this photo of a SeaScape that I captured. Setup was simple. Find the spot I liked and set up the camera with some GND filters. As the sunset arrived, took a bunch of photos, bracketing and watching my histogram. This was the one I liked. There is some vignetting on the top corners but I actually liked it so did not try to work that in Photoshop.

Thursday, October 23, 2008

A Different View


This is a photo of Pola Rock in American Samoa. It is located in the National Park and is a beautiful rock formation often photographed. Most of the photos I have seen are with the rock filling the frame (I have some nice photos like that). But I was never satisfied. Then I remembered an article I read about thinking outside the box. Sure, get your safe shots first, but once you have that, go ahead and try something different. In this case, I wanted to show the formation as something more mysterious, so I used a wide angle lens. Walking down the road, I found this flower and I liked the little "V" shape in the foreground leaves which kind of leads your eye into the frame. Now, which my camera on my tripod and using f16 (I think) to get everything from the foreground out sharp I took a photo. Unfortunately, the foreground was too dark. Since I couldn't use a graduated neutral density filter (which I confess I left at home) I did this. With my camera in manual mode and at f16, I dialed in the shutter until I had the proper exposure (making sure I did not blow out my highlights - histogram and nothing bunched up on the right side). Of course, the foreground was dark. So I pulled out my canon 550ex flash and two pocketwizards (which allow you to use your flash off camera). I then adjusted the power of the flash until I had a foreground exposure I liked. By using off camera flash, I was able to bring the flash closer to the red flower to get that to really pop. So how to do that if you are alone? Use the timer (with your camera on the tripod). This gives you time to handhold the flash where you want (of course if you brought a stand for your flash you can just do it that way. Take some photos, check your histogram and you are done.

Wednesday, October 22, 2008

Ups and Downs


It's funny how we take so much for granted. It was a bad day today. The air con in the house was broken (if you live in a place with the humidity as high as it is here you would understand) and just wasn't a good day. Then went to the beach after work and watched a nice sunset and realized life isn't that bad. I'm lucky enough to like in a place that is safe and I don't have to worry about my kids in school (so much violence in drugs in a lot of schools now in the U.S.) and it takes me two minutes to get to work. And looking at CNN, just being happy I'm in a job that has some good job security (knock wood). It brought me back to when I first went to the Philippines. Prior to that trip I used to think I had life tough. Then I saw so many people living in homes that didn't have a toilet and shower, let alone hot water. So sometimes you just need to count your blessings and be happy with what you have.

Tuesday, October 21, 2008

People


Aloha, I decided to switch gears today and talk a little bit about photographing people. I enjoy travelling and at first I turned my camera to the beautiful landscapes and architecture of the places I have visited. But, I ignored the fascinating people that you are sure to encounter. Now different cultures have varied views on the acceptance of taking photos. It is best to check ahead of time to get an idea. And if in doubt, ask the person if you can take their photo. Most people don't mind and it is a great way to meet people. Canon makes an excellent 24-70L lens that is a great piece of glass. It is fast (2.8) and I often use it as a walk around lens. But I have also been using my 100-400L lens lately. At 400mm, you get great out of focus backgrounds (bokeh) when wide open which draws attention to your subject. And at 400mm, you don't need to be right up to the person, which makes it a great lens to photograph cultural performances. I use a monopod with this lens (it is heavy) but being an L lens (best of the canon lenses have L designation) it is very sharp. Now as a guideline, I have found that 1/500th of a second will freeze the movements of performers quite well. I find that at a slower shutter speed, you may get a slight blur of a hand or other body part (depending on how fast people are moving). Again, just a guideline but works well for me. If I have to shoot slower, I try to anticipate when they will stop (if even for a second). AND, shoot bursts (especially if shooting digital - it is free). It increases your chances of getting a sharp photo and an expression you like.

Now getting that out of focus background is determined by a couple of things. 1st, the larger the aperture, the greater the out of focus the background will be (shallow depth of field means you need to focus more carefully though). So all things being equal, at f2.8 you will get a much shallow depth of field then at f16. Also, the longer the lens, the shallower the depth of field (again at 400mm, you get a more shallow depth of field then at 100mm). The most important thing to have in focus is normally the eyes, so I generally try to put the focus point of my camera on the eyes. Depending on your camera, you will probably be able to pick one of the focus points. Practice so you can change the focus point on the fly. This will help improve your people photography.

Hope this helped.

Monday, October 20, 2008

Opportunities


Every once in awhile you will get a unique photo opportunity. That happened to me earlier in the year when there was a Lunar Eclipse. But, It wasn't going to be until late at night (I'm normally an early sleeper) and the weather looked cloudy. Luckily, I decided to stay up late and ended up shooting a series of the eclipse that is now one of my favorite photos. Taking good photos will often require you to get up before dawn or stay at a location until last light (or beyond). Anyway, when shooting the moon, I always shoot manual. I generally start off at 1/125th at f11 (ISO 100). Remember, the moon is bright. Look at your histogram and make sure you don't have any blown out hightlights. Also remember your histogram will be bunched up to the left as the sky is black. Once you get a good exposure, I would also bracket some shots just to make sure. One more thing, you are better using a long lens (how many of you have taken a beautiful moon photo only to get home and it is so tiny). These photos were all taken with my canon 100-400 lens at 400mm. If I had a 600mm I would have used that.
I hope you enjoy the photo.

Sunday, October 19, 2008

Seascape


Yesterday I decided to take the kids to the beach and see if I could get some sunset photos also. I like seascapes, but have not taken too many so I figured it would be a good time to get some photos of sliding rock in American Samoa. For this photo I used my 17-85 lens that came with my camera. At 17mm, it takes some nice photos and at the time I wasn't sure if I was going to take some close up of the rocks so didn't bring my 10-22 wide angle. I could have brought both but I hate switching lens at the beach. Now when shooting these types of shots you will quickly find that since the sky is much brighter than the foreground, if you expose for the sky, the rocks will be too dark. If you expose for the rocks, the sky will be blown out. In order to expose this properly, you have two choices. You can expose one shot for the foreground and another for the sky and then combine the two in photoshop. Or, you can use a graduated neutral density filter (GND as they are commonly called). I prefer to do as much as I can with the camera so I use a GND. You can google and find out a lot of information on using GNDs so I won't spend a lot of time explaining. I always use a tripod since I am using a long exposure to get the water soft (can you believe in this photo there were 2-3 foot waves breaking - the long exposure smoothed them out). In this case I believe the exposure was 25 seconds at f22. I also use a cable release. With the camera on the tripod at 17mm I also put the focus in manual and set the focal point at 10 feet. This hyperfocal distance (see previous post) ensured everthing from my foreground to the background would be in focus. I also used the histogram on the back of the camera to ensure I had no blown out highlights. This website gives you some good information on understanding your histogram on your camera. If you are shooting digital, it is important you understand the histogram. http://www.luminous-landscape.com/tutorials/understanding-series/understanding-histograms.shtml
I hope you found this information useful.

Saturday, October 18, 2008

Shooting Flowers Outside

Today I would like to talke a little more about flowers. Taking photos of flowers outside can be fun and here are some tips to make it more enjoyable:

1. Find a day when it isn't windy.
2. I prefer a cloudy day and avoid the harsh sun (earlier in the morning or later in the afternoon works good).
3. Bring a tripod and a cable release (or use the timer on your camera to trigger the shutter)
4. Watch out for distracting backgrounds. Look around in your view finder. Often you will need to move the camera a couple of times to find a nice shot.
5. Bring a reflector or some white cardboard. It often comes in handy to kick some light back into the shadows.
6. Get to know the depth of field for your lens. A shallow depth of field generally works better to blur out distracting backgrounds (but too shallow and your subject may not all be in focus.
7. I bring different color cardboard (I like black) and will have a friend hold it behind the flower at times (good way to get rid of distracting backgrounds).
8. Take a number of photos from different angles.
9. Look at your histogram to make sure your flowers do not have blown out highlights.
10. Enjoy.

The photo below is out of the camera. I did some adjustments in photoshop to get the final image above. Again, I ran Midnight black action (see prior post) to get something I like.

If you want to learn more about depth of field and even download for free a both a depth of field calculator and a hyperfocal distance calculator, check out http://www.dofmaster.com/. There are a lot of good information on depth of field there.


Friday, October 17, 2008

Flowers with a Twist

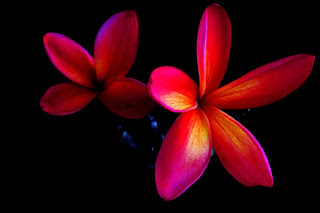
I like taking photos of flowers (there I said it). Where I live there are an abundance of flowers and I found taking photos of flowers I have picked is a good way to pass a rainy day. Photographing flowers inside also means no worries about wind to blur your photos due to the flower moving. The flower above was shot with available light in my room. The dark background was achieved by putting some black fabric behind the flower and out of the sunlight coming in through the windows. If the light falling on the background is 3-stops less than the light falling on the subject you will get a black background. Note: try this with someone standing in a doorway where light falls on them but the light in the doorway is darker (instant black background). I used my 100-400 lens for this photo (no macro lens used). In photoshop, I ran an action called 'Midnight Black" which gave the photo a look I liked. You can download for free (along with a lot of other free actions) at www.atncentral.com/downloads.

Get In Close

Okay, continuing my day at Nuuuli waterfall. I have my photo of the waterfall. I then walked downstream and got a photo of the smaller stream. But you can look even closer to see what you might be able to find. Here was a single leaf stuck on a rock, with the water flowing around it. I wanted a slow shutter speed to slow the water around the leaf. I think this is a 25 second exposure. Did it turn out how I thought (nope). Do I like it (Yes). When I opened in photoshop (raw) I took the blacks up to make the water dark. Few clicks in curves etc. and I have a photo that I think is unique. So don't be afraid to play around with some closeups. As a side note I have a bunch of photos from that day I don't like at all. I use digital and although I try to make every photo a keeper, I experiment. I also bracket my exposures quite often. This leaf photo was taken at a number of shutter speeds, from 1 second to 30 seconds. My kids think I'm crazy but that is how you get some unique photos.

I hope your enjoyed this synopsis on my day at the waterfall. Had the kids with me but still think I was able to get some nice photos. Please leave a comment if you liked this. Next I will talk about some motion/pan photos. Until then, keep shooting.

Thursday, October 16, 2008

Alternative Views


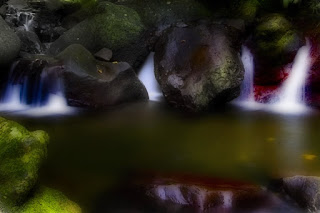
Okay, you got that photo of the waterfall you wanted, but don't stop there, explore downstream if you have the chance. You may be able to get some photos of the smaller pools, which can make for a great photo also.
Now for this photo I wanted to go for the orton look. Michael Orton was a landscape photographer that created some beautiful photos. Although he used slide film, you can create the same look with digital. Here is how:
1. Open your original file in Photoshop
2. Go "Image" "Apply Image" and change the blend mode to Screen and opacity 100%. Click Ok.
3. Go "Image" "Duplicate" and when the box opens, click ok. This opens up your duplicated image.
4. On this new image, go "Filter" "Blur" "Gaussian Blur". Set the radius between 10 to 50, the higher the radius you set, the more dreamy the look (which can easily be overdone). I use around 25 for the most part. Hit ok.
5. Now go "Select" "All" and then "Edit" "Copy", Minimize or close this photo (which brings you back to your original photo.
6. On the original photo go "Edit" "Paste".
7. On your layer pallete, change the blending mode from "Normal" to "multiply". If you like it you are done, or you can change the opacity.
Once you got that, you can go ahead and play with your curves etc. to get your final photo. I hope this was helpful. It doesn't work for every photo, but give it a try, you might like the results.